This tutorial will give you a little foundational information on the 3D capabilities of Illustrator CS5. I will show you how to create a basket of fruit as an example. Let’s get started!
Step 1:
Create a new document in Illustrator. Make sure it has a high resolution (300 ppi is preferred).

Step 2:
Use the “Ellipse Tool” to create an oval that looks something like this.

Step 3:
Select: Effect > 3D > Revolve. This will bring up your 3D options. Check the “Preview” box and make sure that your sphere looks like an apple.


Then, simply select the apple and change it to a color of your liking.

Step 4:
Now, we need to add a stem to make it more realistic. Use the “Pen Tool” to draw a short curve, making the stroke color brown and adjust the weight accordingly. Use the “Ellipse Tool” to make a small circle at the top of the stem.

Now, we should group everything we have so far. Do this by selecting everything and right clicking and selecting “Group”.

Step 5:
Now, we can easily produce different colored apples! Hold down the “Option” key and drag the apple to create copies. Note: You will need to “Ungroup” the apple from the stem to change its color while keeping the stem the same color. We can do this the same way we grouped them together, using the right-click.

Step 6:
Now, we need a bowl/ basket for our fruit. Using the pen tool, click and drag to make a basic curve like this. Remember, this is going to be rotated to make a 3D model and we don’t have to try to draw the whole basket.

Click the 3D > Revolve as before to get something like this.

Step 7:
If you want to easily change the form of your basket, use the “Add Anchor Point Tool” to make a new point along the outside of the basket. Adjust the point to your liking.

Step 8:
Now, we need to select the 3 apples together and bring them in front of the basket.

Right-click > Arrange > Bring to Front

Step 9:
To make the apples appear like they are inside the basket, we need get set up for a “Clipping Mask”. Using the “Pen Tool”, draw around the part of the apples that you want to be showing inside the basket. It should look something like this (the fill color won’t matter).

Step 10:
Finally, select the new area and all 3 apples together. Object > Clipping Mask > Make.

FINISHED FRUIT BASKET!

This tutorial will show you have to apply gradients effectively to texts to create headlines that looks both unique and professional. Let’s get started.
Step 1:
Create a new document in Illustrator. Use CMYK color mode if you are planning on printing.

Step 2:
Use the “Text Tool” to make a fairly large word for your headline. If you are just practicing, “Hello” will be fine.

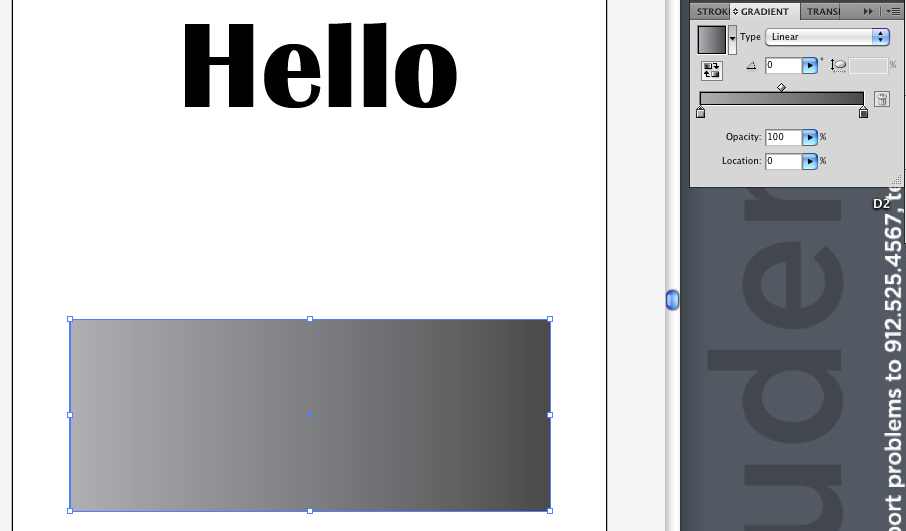
Step 3:
Next, use the “Rectangle Tool” to make a box that is bigger than your text. Apply a gradient to the box with the right side being a slightly darker shade of the same color than the left side. Here, I used grey and darker grey to portray a professional look.

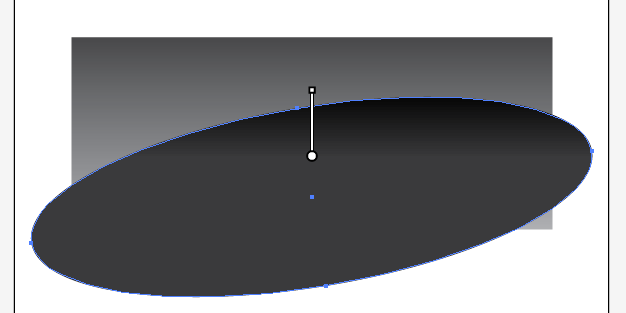
Step 4:
Select the “Ellipse Tool” and create an oval that is shorter but wider than the rectangle. Apply a gradient to this as well, making the top black and the bottom very dark grey.

Then, rotate the oval 20 degrees or something similar that you like and readjust the gradient by dragging and holding down the Shift button.
Step 5:
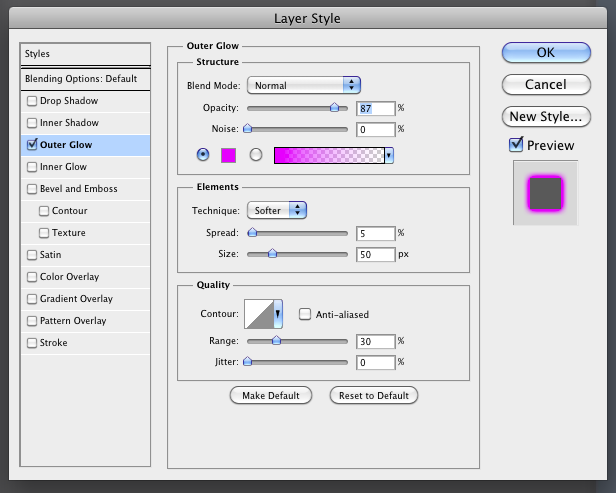
Effect > Stylize > Outer Glow

Step 6:
Mode= Normal, Color= White, Opacity= 100%, Blur= 12 px. These setting work well but feel free to experiment on your own

Step 7:
Next, place the text over the 2 shapes and select all 3 together.

Step 8:
We want to make a clipping mask so that our gradients will be applied to the text. To do this, select Object > Clipping Mask > Make.

Step 9:
It should look pretty good now, but let’s take it a step further. Make a copy of the text just below by holding the “Option” key and dragging downward. Once you have that aligned, select Object > Transform > Reflect.

When you get the option, select “Horizontal” for the reflecting axis.

Step 10:
Lastly, we need to change the transparency of the reflected text to make it look like a shadow. Go to Window > Transparency.

Use a low opacity like 10% so that it doesn’t distract viewers from the main text.

FINISHED TEXT!

This is a tutorial that can show you a little bit about using brushes in Photoshop. Let’s get started!
Step 1:
Create a new document in Photoshop with any settings you like.

Step 2:
Find a photo of your own and drag into Photoshop. You can then size it or crop it to your liking. Just make sure you have some room to play with.

Step 3:
Create new layer and name it “Neon”.

Step 4:
Select the “Brush Tool”. In the top left corner of the screen, click the second drop down menu. Then click the little arrow in the top right corner of the box and select “Assorted Brushes”. Note: This is where I found my brush but feel free to explore on your own, as each brush can give you a very different effect.

Step 5:
Now, open the brushes menu. Select your brush and adjust the spacing (and hardness if applicable).

Step 6:
Layer > Layer Style > Outer Glow

Step 7:
This is where we will be pick our neon colors… so think BRIGHT! Make sure to click the “Preview” button because it allows you to get an idea of what the styling will look like before you apply it.
Step 8:
Use the “Pen Tool” to draw a curved path. Make sure you have the Path button selected. Then, right- click and choose “Stroke Path”.

Tool= Brush, Check “Stimulate Pressure” box.

Step 9:
Delete the work path by dragging it to the bottom of the Paths channel.

Step 10:
Now, let’s add some layering. Create a “New Duplicate Layer”. Go to Image > Adjustments > Invert.

Step 11:
The last step is to shift the inverted neon layer we just made to behind the original neon layer. To do this just drag it downward.

FINISHED PRODUCT!

This tutorial will show you how to create neat swirls that can be turned into trees or used simply as a unique background. Let’s get started!
Step 1:
Create a new document in Illustrator with the following settings.

Step 2:
Use the rectangle tool to create a box that is 320px in width and 32px in height.

Step 3:
Use the direct selection tool and click on the bottom right corner of your box. Once this is selected, press delete. This should leave you with half of the box remaining, looking something like this.

Step 4:
Now, use the pen tool to connect the remaining 2 corners, forming a triangle. Take off the stroke and make the fill color black. You have just created the shape that we are going to use to make our branches.

Step 5:
With the shape selected, go to your brushes menu on the right side of the screen and select the icon at the bottom for “New Brush”.

Then, select “art brush” and give it a name you’ll remember so you can find it easily.

Step 6:
Under the “Line Segment Tool”, select the “Spiral Tool”. Click and drag to make an average sized spiral (you can use the up and down arrows on the keyboard to edit your spiral while holding down the mouse). Your new brush should be on the right of your screen. Select it and increase the stroke as you like.


Step 7:
Use the brush tool to then make a curved line for your main limb.

Step 8:
Experiment with the stroke weight for this line until you find one that allows you to overlap the 2 pieces like this.


Step 9:
Finally, use the pen tool to make a few leaves, or thorns, (holding down the “option” key and dragging will make identical copies) and fill them with a color of your choice.

Step 10:
Place them on your branches and use “Arrange” accordingly and you have created your own branch!
FINISHED BRANCH!

Hello everyone. This is a tutorial that will teach you how to create buttons in Photoshop for use on websites and such.
Step 1:
After creating a document that is sized to your liking, create a new layer and select the “Rectangular Marque Tool”. Use this to make a decent size rectangle. Keep in mind that this will become your button! Then, click “Select” at the top of the screen and go to Modify-> Smooth.

Step 2:
Set to 3 pixels.

Step 3:
Select a color and fill the rectangle using the “Paint Bucket Tool”.

Step 4:
In the “Layer” bar at the top of the screen, go to Layer Style-> Blending Options. This will be the main place to visually enhance your button.

Step 5:
In the “Inner Shadow” bar, select the “Overlay” blend mode and choose your blending color (black or white works nicely).

Step 6:
Also, edit the “Outer Glow”. Experiment with the Opacity until you find what you like best. I set mine to 75%.

Step 7:
Select the “Gradient Overlay” bar. In the Blend Mode option, select “Darken”.

Step 8:
Then, select Gradient Type-> Solid. Play around with the Smoothness and Stops until you find something you like.

Step 9:
The Stroke bar will provide you with many options for the border of your button. You may select a color if you wish but black or white will do just fine. From there, select a size of 5 pixels. A smaller stoke is good because it won’t be too distracting. Position, Blend Mode, and Opacity are personal preference as well.

Step 10:
Now, we need to add some text. Add a new layer. Select the “Horizontal Type Tool” and insert a word according to your button’s purpose.

Step 11:
Finally, use the Layer-> Layer Style-> Drop Shadow to give your text some dimension by adding a slight angle to your shadow.

Finished Button

DONE!
